本篇目標:
- kubernetes cluster 架構
- kubectl 再一些指令
- 通用:
kubectl -v,kubectl proxy- kubectl 一些操作
- kubectl api-resources
- kubectl api-versions
- cluster 切換
- kubectl config get-contexts
- kubectl config use-context {{ context-name }}
- kubectl config current-context
- k8s 的 Service
- k8s configuration file
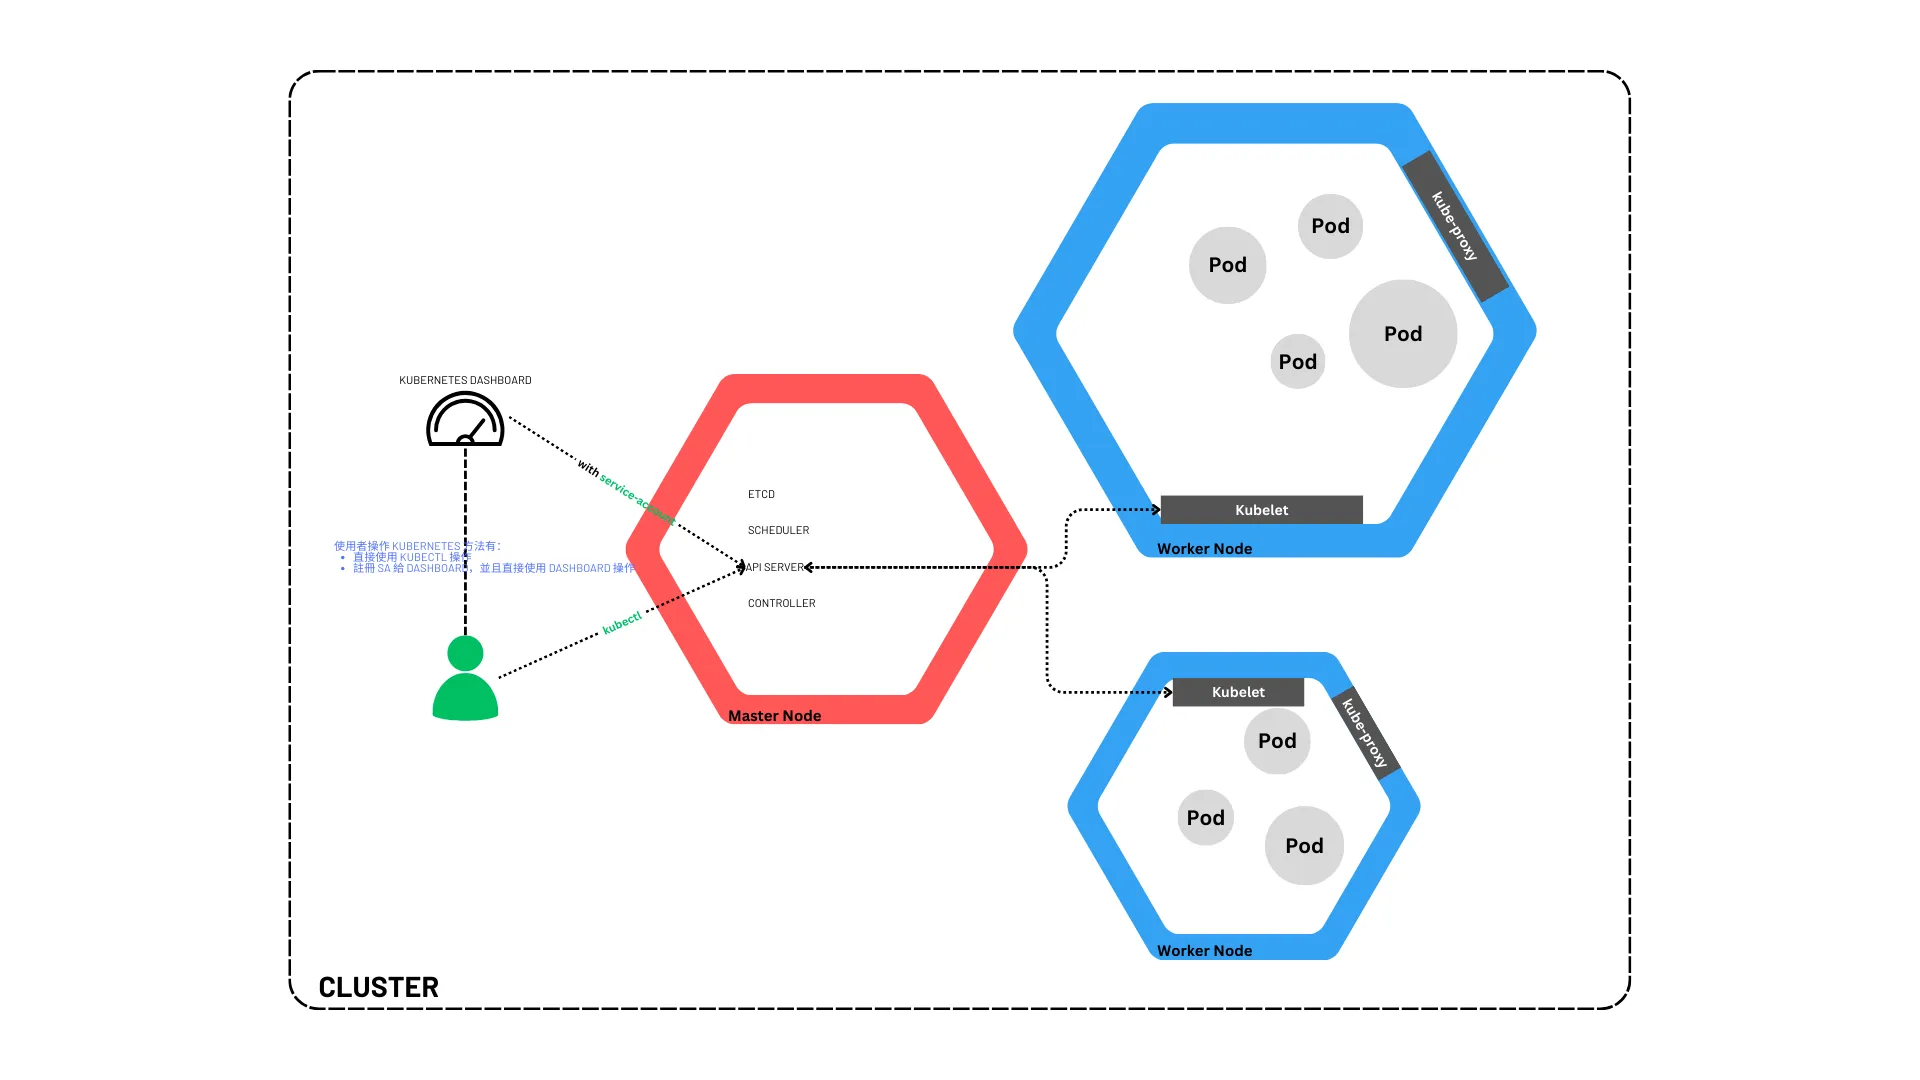
kubernetes cluster 架構: 官網圖
kubectl 再一些指令
通用
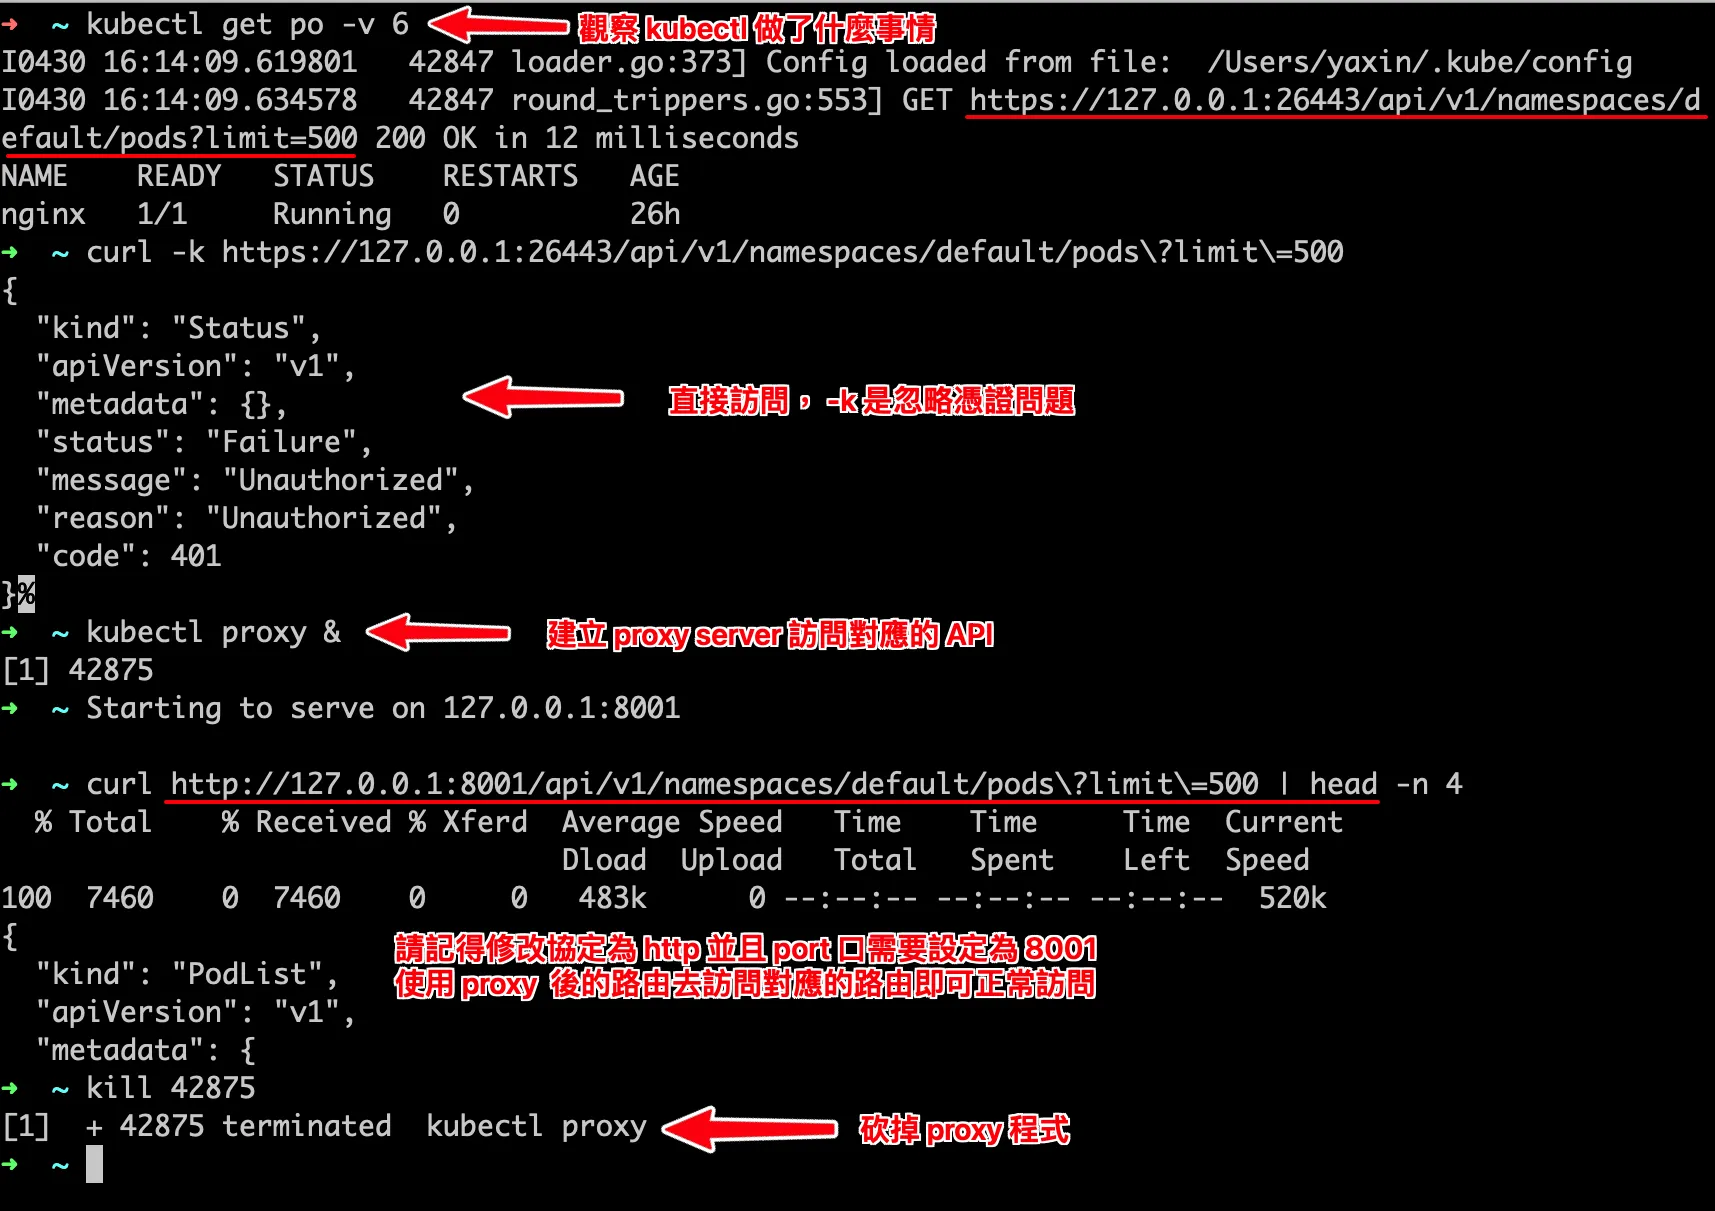
verbose with kubectl:
kubectl -v {{ LEVEL }}-v : verbose
顯示 kubectl 呼叫了什麼 API, LEVEL 為數值越大,顯示的資訊越多(最大: 10)
例如:kubectl -v 6 get pokubectl proxy
kubectl proxy: 啟動一個 proxy server,透過這個 server 可以直接訪問 k8s 的 API server
例如:curl http://localhost:8001/api/v1/namespaces/default/pods
接續補上一些指令:
kubectl api-resources: 列出所有的資源kubectl api-resources --api-group=apps
kubectl api-versions: 列出所有的版本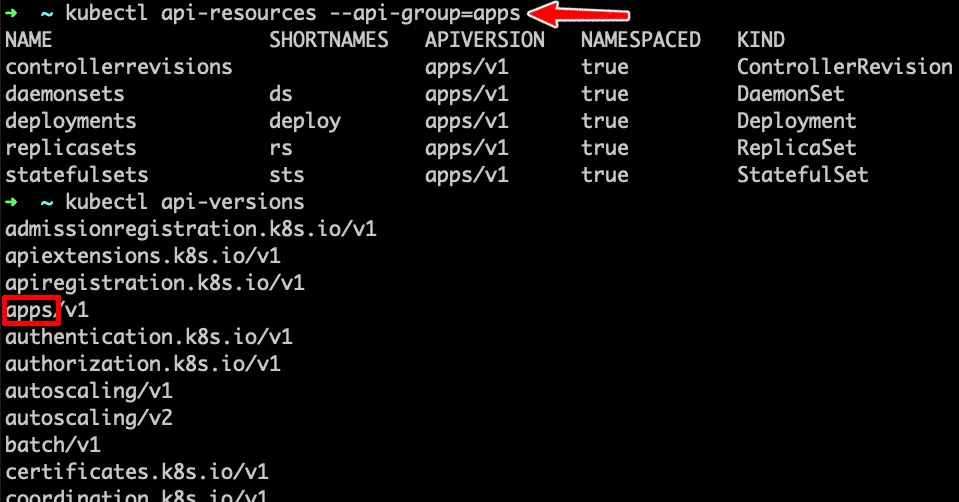
cluster 切換:
會用到這個主要是一開始在學有裝了很多不同的軟體(如:
Docker Desktop,OrbStack,Kind),
而沒注意到個別軟體都有自己實踐了 kubernetes 的 cluster,
因此學習時沒注意到這個問題,後續才想到是這個問題:
kubectl config get-contexts: 列出所有的 contextkubectl config use-context {{ context-name }}: 切換 contextkubectl config current-context: 查看目前的 context
k8s 的 Service
A Kubernetes Service is an abstraction which defines a logical set of Pods and a policy by which to access them.
Kubernetes Service 是個抽象化的概念,主要定義了邏輯上的一群 Pod 以及如何存取他們的規則。
Service 是一個抽象的概念。
有點像是 pod 的上層,透過 Service 可以將 pod 的服務對外開放,並且可以透過 Service 來做負載均衡。
Service 有四種類型:
spec:type: 服務的類型ClusterIP: 預設的 Service 類型,只能在 cluster 內部存取。(預設值)NodePort: 對外開放一個 port,可以透過 node 的 IP 來存取服務。LoadBalancer: 透過 cloud provider 提供的 load balancer 來對外開放服務。ExternalName: 對外開放一個外部的服務。
selector: 選擇器,用來選擇對應的 pod。ports: 服務的 portport: Service 的 port -> 這是 Service 對外開放的 port。targetPort: pod 的 port -> 此為 pod 的 port,Service 會將流量導向到這個 port。nodePort: NodePort 的 portprotocol: 通訊協定 (TCP/UDP, 預設: TCP)
k8s configuration file: kubernetes config
名稱: Kubernetes Support (vscode plugin)
- 識別碼: ipedrazas.kubernetes-snippets
- 描述: Code snippets of kubernetes for Visual Studio Code.
- 版本: 0.1.9
- 發行者: ipedrazas
- VS Marketplace 連結
安裝完後在 vscode 輸入 deploy 關鍵字,就會跳出對應的模板。
基本上 k8s 的 yaml 檔案結構:
- apiVersion: k8s API 版本
- kind: 資源類型 -> 可藉由
kubectl api-resources查看 - metadata: 資源的 metadata
- name: 資源名稱
labels: 附加在 k8s 物件上的標籤,使用者可以透過其進行分組。
- name: 資源名稱
- spec: 資源的規格(會因為資源類型而有所不同)
demo1
簡單的自己撰寫一個 pod yaml 檔案。
- 當 kind: Pod 時,spec 中的 containers 會是一個 list,每個元素代表一個 container。
spec.containers.[*]: 容器的規格- name: 容器名稱
- image: 容器映像檔
- ports: 容器的 port:
containerPort: container 開放的 port 來允許外部資源存取。
# simple-pod.yaml
apiVersion: v1 # api 版本
kind: Pod # 建立的種類
metadata: # 附加資訊
  name: php-demo # kubectl get pod 的名稱
  labels: # pod 的標籤 -> 可以透過選擇器來選擇 pod
    app: php-demo # 驗證: kubectl get pod -l "app=php-demo"
    hello: world # 驗證: kubectl get pod -l "hello=world"
spec: # 規格 specification
  containers: # 多個容器在一個 pod 中
    - name: php-demo
      image: sam33339999/php-demo
      ports:
        - containerPort: 80
    - name: redis
      image: "redis:latest"
      ports:
        - containerPort: 6379
這邊建立的 pod 並沒有對外開放服務的權利,由於 pod 是一個或多個 container 組成,因此這邊只有設定 pod 對外可存取的接口。
建立完上述的 pod 後,可以透過kubectl apply -f simple-pod.yaml來建立 pod
並且透過kubectl port-forward pod/php-demo 8888:80來將 pod 的 80 port 對應到本地的 8888 port。(不要關閉他)
新的命令列輸入curl http://localhost:8888來測試是否可以存取到 pod 的服務。
demo2
本來想說要透過一個 pod 建立兩個 container 來提供服務,但是發現預設 k8s 他會在對應的 pod 上暴露所有 container 所有 expose 的 ports
當 containers port 有衝突時… 好像就會有問題。
我想要透過兩個不同的容器來提供服務,
LoadBalancer後會將流量分配到這兩個容器上,
但是似乎本地不支援LoadBalancer…
所以先測試NodePort的服務。
建立 Service
apiVersion: v1
kind: Service
metadata: # 服務名稱 -> kubectl get svc
  name: php-demo-service
spec:
  selector: # debug: 確定 selector 是否為我們要的,可以使用 -l 來去取得對應的 pod:
    app: php-demo # `kubectl get pod -l "app=php-demo"`
  ports:
    - protocol: TCP # allow protocol
      port: 8888 # service port
      nodePort: 30001 # node port(可以不設定,他會 random 一個 port,通常 30000~32767)
      targetPort: 80 # pod's port
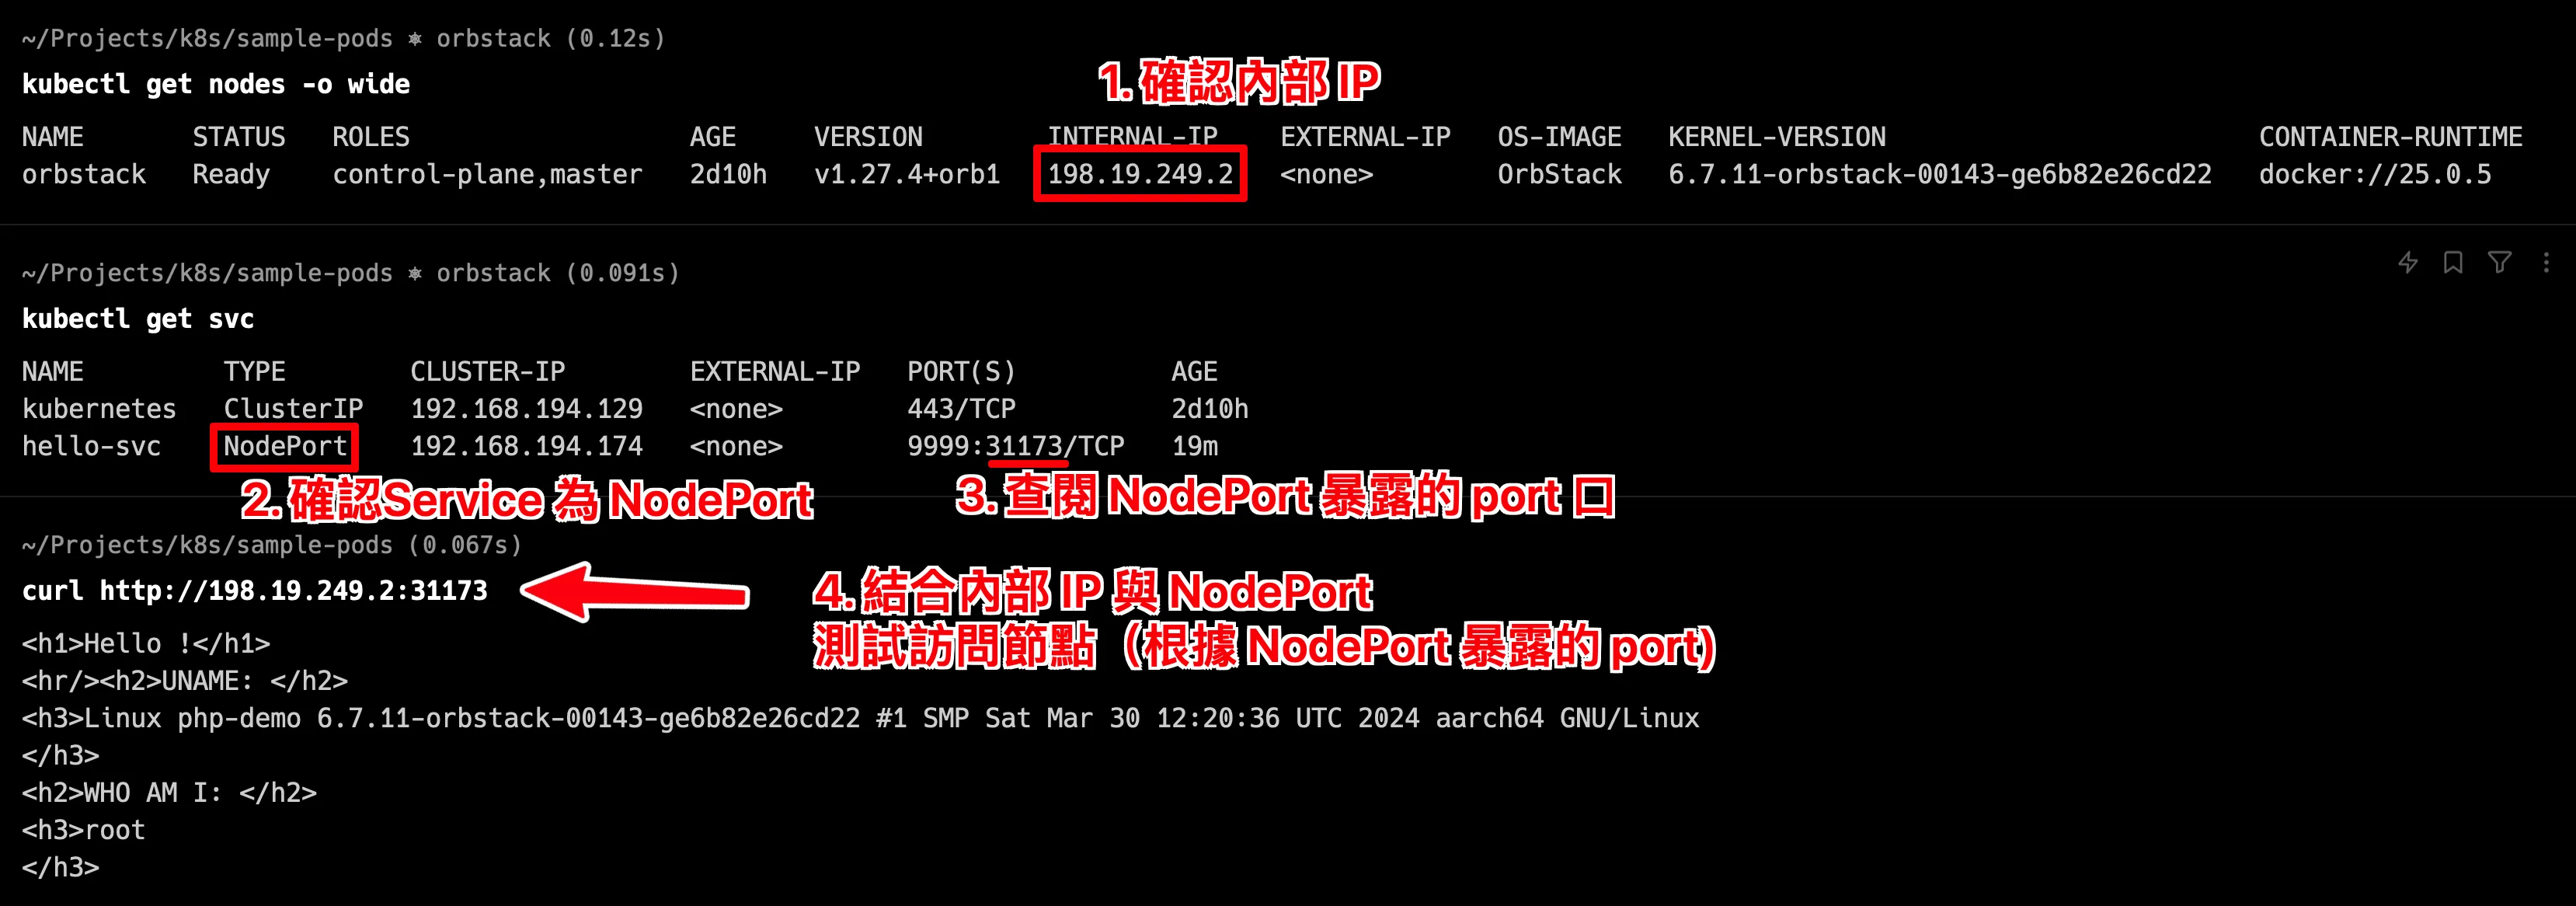
測試 NodePort 的服務,透過 kubectl apply -f service.yaml 來建立 Service
先查詢 node 相關資訊: kubectl get nodes -o wide ,這邊可以看到 node 的 IP 位置。
接著透過 curl http://{{ node-ip }}:30001 來測試是否可以存取到服務。
參考資料
下篇可能討論
本篇沒有談到 Service Account,下篇應該會討論到他… 然後再來看看 Deployment, StatefulSet, DaemonSet 等等..
- Deployment
- ReplicaSet
- StatefulSet
- DaemonSet
- Service Account (sa)