Kubernetes是一個開源的容器管理平台,可以自動化應用程式的部署、擴展和運營。
在目前的資訊產業發展中,他算是一個業界常使用到的工具…吧!? - 雲服務相關。
為了自己的進步,來開始學習這項技術吧!
本篇目標:
- 了解
Kubernetes的基本概念- 使用
kind建立一個集群kubectl的一些指令- 嘗試建立一個
podKubernetes Dashboard的安裝與使用
在開始前,先說說我對部屬的概念的演進:
- 架設伺服器(instance)
- 最早期的時候,我們可能是一台物理機器架設一個或多個的應用程式。(隔離性問題)
- 虛擬化(virtual machine): like:
VMware,VirtualBox,Proxmox VE…
- 隨後,我們開始使用虛擬化技術,將一台伺服器切割成多個虛擬機器,這樣可以更有效的利用資源。
- 容器化(container): like:
Docker,Podman…
- 後來,我們開始使用容器化技術,將應用程式打包成一個容器,這樣可以更有效的利用資源。
- 容器管理平台(container orchestration): like:
Kubernetes,Docker Swarm…
- 最後,我們開始使用容器管理平台,來自動化應用程式的部署、擴展和運營。
了解 Kubernetes 的基本概念 -> 聊聊 Kubernetes 的一些組件與概念吧!
首先,
Kubernetes因為名稱太長了,所以我們先簡稱為k8s,取至K和s之間的 8 個字母。
在k8s中, 最小的 deployable 單位是Pod,
而Pod是一個或多個容器的集合,這些容器共享網絡和存儲,並在同一個節點上運行。
節點與組件
由於在
k8s中,他是集群管理的概念,因此我們會有主要的節點與工作節點的區分。
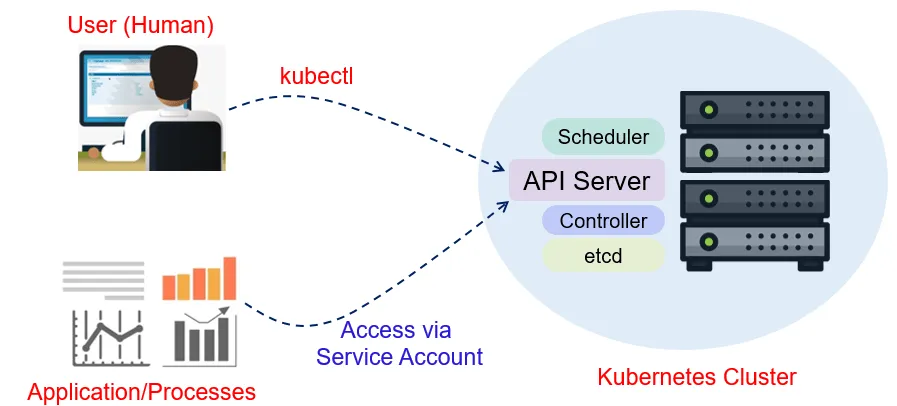
- Master Node(Control Plane)
- 主要負責管理整個集群的控制節點
- 組件:
- API Server: 與集群交互的接口 -
kubectl - etcd: 集群配置的存儲
- Scheduler: 負責調度器,決定應用程式在哪個節點上運行
- Controller Manager: 負責控制器,負責管理控制器
- API Server: 與集群交互的接口 -
- Worker Node
- 負責執行應用程式的工作節點
- 組件:
- kubelet: 負責管理節點上的容器
- Kube-proxy: 負責網絡代理
- Container Runtime: 負責執行容器的運行時
配套的學習工具有哪些(href):
-
kind: 使用 Docker 容器作為節點,在本機快速運行起 k8s 集群的工具。 通過該工具可以快速建立如 k8s 原生的本地環境;且佔用的資源較少、啟動速度快。 多用於本地開發和測試 k8s 原生組件。不能用在 production 環境。
-
minikube: 一個在本地運行 k8s 集群的工具,支持多種操作系統,如 Linux、macOS 和 Windows。 通過該工具可以在本地快速運行一個小型的 k8s 集群,用於開發和測試。
-
kubeadm: 一個用於快速部署 k8s 集群的工具,支持多種操作系統,如 Linux、macOS 和 Windows。 通過該工具可以快速部署一個生產環境的 k8s 集群。
-
kwok: 模擬 k8s 集群的工具,他可以在幾秒鐘內搭建一個由數千個節點組成的 k8s 集群,整個過程僅占用非常少的資源,輕鬆實現在本機上學習、測試和開發 k8s 集群應用。
使用 kind 建立一個集群: 以 kind 作為切入點學習 k8s 的基本操作
# 建立集群
kind create cluster
kind create cluster --name aio -v 5 # -v: verbose level: show more detail.
kind create cluster --name cluster --config kind-config.yaml # with setting config file

# 查看集群
kind get clusters

# 刪除集群
kind delete cluster
kind delete cluster --name aio
# kind-config.yaml
# 可以設定為兩個 worker node 跟一個 control-plane node
kind: Cluster
apiVersion: kind.x-k8s.io/v1alpha4
nodes:
  - role: control-plane
  - role: worker
  - role: worker
kubectl 的一些指令
# 查看集群資訊
kubectl cluster-info

# 取得 kube cluster 的一些資訊: kubectl get {{ TYPE }} -> TYPE: pods, services, deployment, nodes, namespace ...
# https://kubernetes.io/zh-cn/docs/reference/kubectl/#resource-types -> {{ TYPE_LIST }}
# 也可以透過下列指令查看所有的資源 (short name)
kubectl api-resources

# 查看節點
kubectl get nodes

# 查看所有的 namespace
kubectl get namespace

# 查看所有的 pod
kubectl get pods
kubectl get pods --all-namespaces

# 建立 pod
kubectl apply -f pod.yaml # 建立或更新 pod
kubectl create -f pod.yaml # 只能建立 pod

# pod 描述 (nginx 自行替換自己想看的 pod 名稱)
kubectl describe pod nginx

# 轉發 port (nginx 自行替換自己想轉發的 pod 名稱)
# export to host.
kubectl port-forward pod/nginx 8880:80
嘗試建立一個 pod
kubectl apply -f https://k8s.io/examples/pods/simple-pod.yaml

kubectl get all --all-namespaces

#kubectl describe pod {{ POD_NAME }}
kubectl describe pod nginx

# 轉發 port: kubectl port-forward {{ TYPE }}/{{ POD_NAME }} {{ LOCAL_PORT }}:{{ POD_PORT }}
kubectl port-forward pod/nginx 8880:80

# 測試訪問
curl http://localhost:8880

# TTY TO POD
kubectl exec --stdin --tty nginx -- /bin/bash
# 也可以寫成這樣: kubectl exec -it nginx -- /bin/bash

# 在 nginx 的 pod 中修改原先 index.html 內容
echo 'Hello shell demo' > /usr/share/nginx/html/index.html

# 退出 TTY 再次 curl,確認內容是否被修改(確定要有轉發 port 的指令在執行)
curl http://localhost:8880

# 刪除 pod
kubectl delete pod nginx
Kubernetes Dashboard 的安裝與使用
透過 GUI 圖形界面去管理 k8s 集群 安裝:

brew install helm
helm repo add kubernetes-dashboard https://kubernetes.github.io/dashboard/

# from: 從異世界歸來的第五天 - Kubernetes Dashboard 你的 Kubernetes GUI 神器 (-n: --namespace)
helm upgrade --install kubernetes-dashboard kubernetes-dashboard/kubernetes-dashboard -n kubernetes-dashboard --set metricsScraper.enabled=true --create-namespace

# 取得namespace 為 kubernetes-dashboard 的 pod
kubectl get all -n kubernetes-dashboard

# 服務映射到本地端口
kubectl -n kubernetes-dashboard port-forward svc/kubernetes-dashboard-kong-proxy 8443:443

# 建立對應的 service account
kubectl apply -f - <<EOF
apiVersion: rbac.authorization.k8s.io/v1
kind: ClusterRoleBinding
metadata:
  name: kube-system-default
  labels:
    k8s-app: kube-system
roleRef:
  apiGroup: rbac.authorization.k8s.io
  kind: ClusterRole
  name: cluster-admin
subjects:
  - kind: ServiceAccount
    name: default
    namespace: kube-system

---

apiVersion: v1
kind: Secret
metadata:
  name: default
  namespace: kube-system
  labels:
    k8s-app: kube-system
  annotations:
    kubernetes.io/service-account.name: default
type: kubernetes.io/service-account-token
EOF

kubectl -n kube-system describe secret default
TOKEN=$(kubectl -n kube-system describe secret default| awk '$1=="token:"{print $2}')
kubectl config set-credentials docker-desktop --token="${TOKEN}"
echo $TOKEN
參考資料
- Kubernetes 官方網站
- Kubernetes 中文文檔
- learn-k8s-from-scratch
- k8s_PaaS: 教你用 k8s 部署一套完整服务的教程。通过该教程你可以学习到如何部署 Kubernetes 集群,以及在此基础上搭建由 Apollo、Jenkins、Prometheus 等服务组成的完整的软件研发和部署平台。
- 從異世界歸來的第五天 - Kubernetes Dashboard 你的 Kubernetes GUI 神器
下篇可能討論
可能需要更清楚
kubectl,master/worker node,pod,service,service account的概念
- k8s config yaml files
- Pod
- Service
- Service Account
其他在網路上找到的一些工具(未查驗
-
k3s: 一個輕量級的 k8s 發行版,適用於 IoT 和 Edge 環境。 通過該工具可以快速部署一個輕量級的 k8s 集群,用於 IoT 和 Edge 環境。
-
k3d: 一個在 Docker 容器中運行 k3s 的工具,支持多種操作系統,如 Linux、macOS 和 Windows。 通過該工具可以快速部署一個輕量級的 k8s 集群,用於開發和測試。
-
kubeflow: 一個用於構建機器學習工作流程的開源平台。 通過該工具可以快速構建機器學習工作流程,用於開發和部署機器學習模型。
-
kubespray: 一個用於部署生產環境的 k8s 集群的工具,支持多種操作系統,如 Linux、macOS 和 Windows。 通過該工具可以快速部署一個生產環境的 k8s 集群。
-
kubermatic: 一個用於管理多個 k8s 集群的工具,支持多種操作系統,如 Linux、macOS 和 Windows。 通過該工具可以快速管理多個 k8s 集群。
-
kubeshark: 強大的 k8s API 流量查看工具。 如果把 k8s 比作作業系統,那它就是 k8s 上的 tcpdump,使用起来就像 Chrome 開發者工具一樣簡單直接,能夠讓 k8s 上微服務之間的網路連接一覽無遺。